Project Management
Product Development Process Template
By RP Hobbyist · Updated
Product development is the work of taking an idea all the way to something customers can use. The phases look much the same for software and physical products: check the idea, design it, build it, test it and release it. Putting them on one map shows how each phase depends on the one before.
The template has a Development Cycle root with five numbered phases: 1. Concept (Research, Feasibility), 2. Design (UI/UX, Prototype), 3. Develop (Frontend, Backend), 4. Test (QA, UAT) and 5. Launch (Deploy, Marketing). The Develop branch is set up for software. For a physical product, rename its nodes to something like Engineering and Manufacturing.
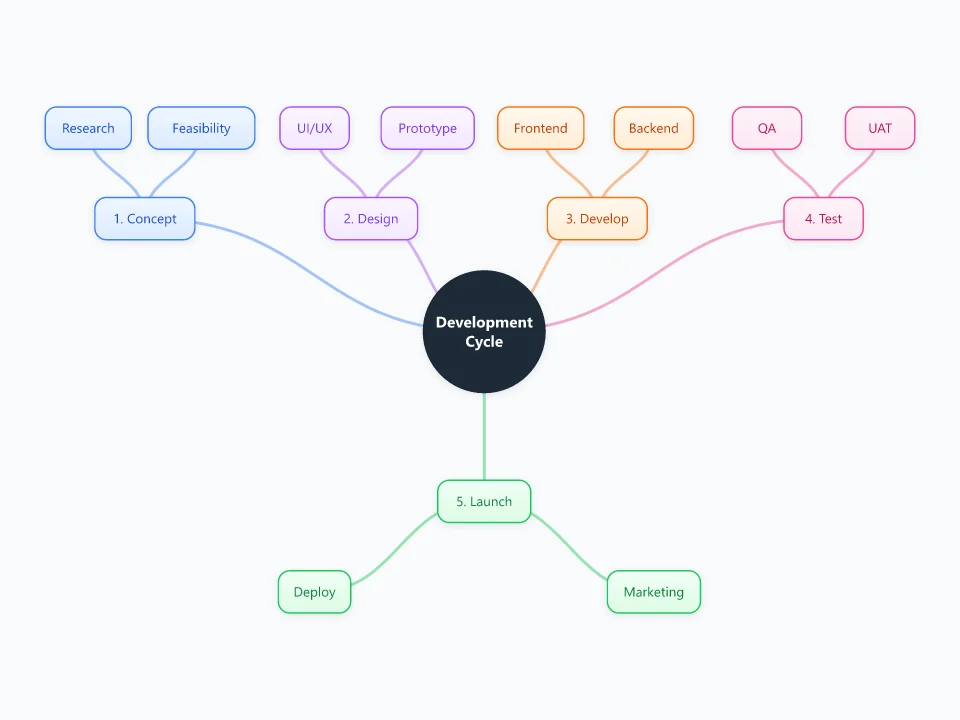
It opens as a new map with 16 topics already filled in. You don't need an account.
Open in the editorWhen to use a Product Development
- Planning a new product or a large feature from scratch
- Getting design, engineering and marketing to agree on the phases
- Explaining your development process to a client or investor
- Checking a running project for a skipped step, like user testing
What goes in each branch
- 1. Concept
- Research covers the customer's problem and what they use today. Feasibility asks whether you can build it with the time, money and skills you have.
- 2. Design
- UI/UX holds the user flows and key screens. Prototype is the earliest version you can put in front of real users.
- 3. Develop
- Split the build into its main parts. For software that's often frontend and backend. Add nodes for integrations or infrastructure if you need them.
- 4. Test
- QA is your own testing against the spec. UAT (user acceptance testing) is when real users confirm it does what they need.
- 5. Launch
- Deploy covers the release itself and a plan for rolling back. Marketing covers how people will hear about it.
Example: A small team building a habit-tracking app
- Concept: interviews with 15 people who gave up on other habit apps, and a feasibility check that shows a three-month build for two developers.
- Design: three core screens and a clickable prototype tested with six users.
- Develop: a React Native app and a simple sync backend.
- Test: an internal QA pass, then a two-week beta with 50 users.
- Launch: release on both app stores, a note to the beta group and a small paid campaign.
Tips
- Don't skip Feasibility. Dropping an idea at the concept stage costs far less than dropping it after the build.
- Prototype early, even with paper sketches. You'll catch design problems before they turn into code.
- Add a Post-launch branch for feedback and fixes. The work doesn't stop on release day.
- Tag each phase with a status so everyone can see where the project stands.
Using this template in Neuron Mapping
- Click Open in the editor. The template opens as a new map.
- Select a topic and press Tab to add a branch under it, or double-click a topic to change its text.
- Select a topic to change its color and shape, or add notes to it in Markdown.
- When you're done, export the map as a PDF or PNG, or save it to keep editing later.
Everything runs locally in your browser: your map is saved on your device, works offline, and can be exported as PDF, PNG or an editable .nmm file.